Procedure: Insertion of an Oral/Nasal Small Bowel Feeding Tube

Ensure that patient and health care provider safety standards are met during this procedure including:

  • Risk assessment and appropriate PPE
  • 4 Moments of Hand Hygiene
  • Procedural Safety Pause is performed
  • Two patient identification
  • Safe patient handling practices
  • Biomedical waste disposal policies

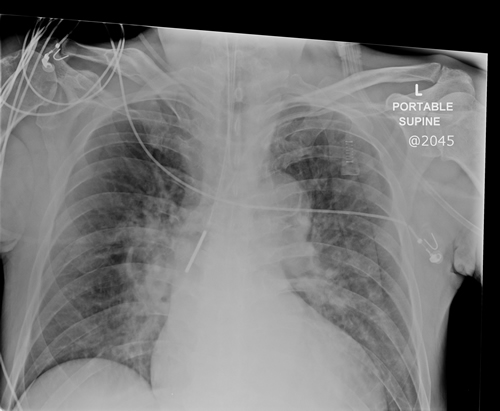
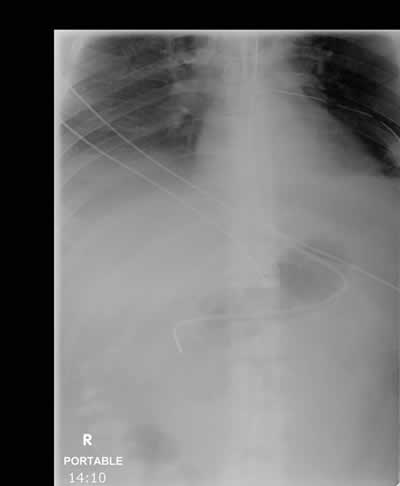
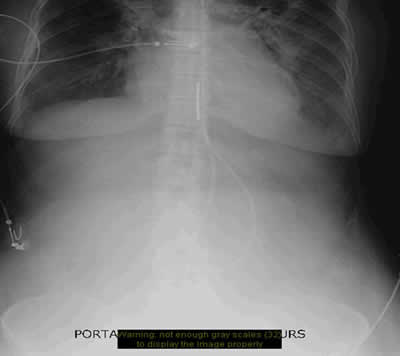
Overview of Safety Protocol: Prevention of Iatrogenic Pneumothoraces

The procedure for the insertion of any feeding tube in CCTC (gastric or small bowel) requires a TWO step process.  Try to coordinate Step One to other routine Xray's if the timing is appropriate to reduce the number of Xrays.

The goal of Step One is to rule out airway placement and confirm esophageal insertion before advancing additional feeding tube into the patient.   Step One confirmation is completed by CHEST Xray.  The feeding tube tip must be below the level of the carina and there must be confirmation that the feeding tube has not followed either the right or left main stem bronchus.

Optimally, the tip of the feeding tube should be inserted no greater than 5 cm below the carina (to reduce the risk for distal airway advancement and potential pneumothorax).

Step One must be confirmed before the tube can be advanced to the stomach or small bowel.  Examine the feeding tube distance marking following completion of the Step One Xray.  If the feeding tube tip distance is optimal on chest Xray, document the insertion distance on the Kardex to inform future insertions (e.g., from the right nare optimal Step One distance is 35 cm).  If the Step One chest Xray demonstrates that the feeding tube tip was greater than or less than optimal, modify the recommended distance before documenting to the Kardex.
 

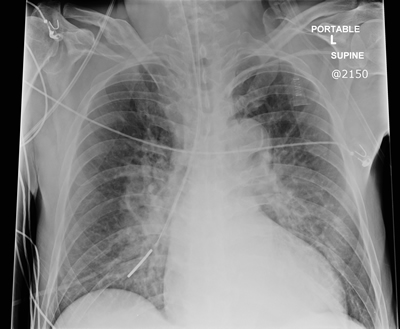
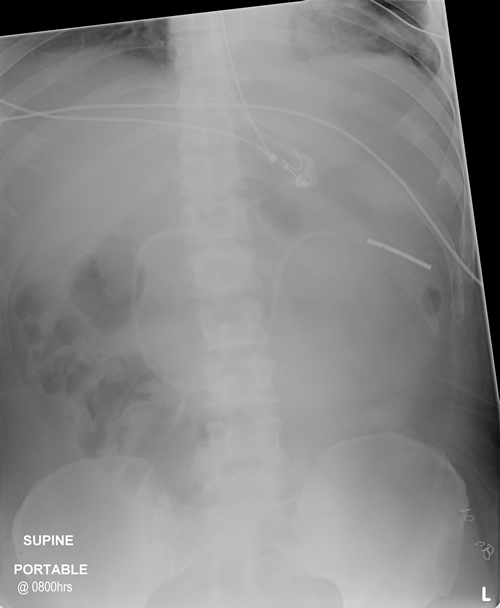
Step Two confirmation is completed by ABDOMINAL Xray following advancement of the feeding tube to the stomach or small bowel.  This must be completed before a patient can be fed.

Optimizing Small Bowel Placement:

To reduce the chance of coiling of the feeding tube within the stomach and to optimize tube placement within the small bowel (ideally to the jejunum), limit the amount of tubing that is initially advanced during Step Two to 80-90 cm. 

After the abdmonial Xray is taken, leave the patient on the Xray plate while the Xray is examined.  If the feeding tube tip has successfully entered the duodenum, advance the remaining tube (or until resistance is met) with the patient still on the Xray plate.  Repeat the abdmoinal Xray after advancement and ensure that the final image is uploaded to Power Chart as placement confirmation.

If the feeding tube is coiled in the stomach at 80-90 cm, do not advance the tube any further.  Remove the wire and attempt gastric feeding (advancing more tube leads to large loops of coiled feeding tube).

Goal for Step One Placement:


Optimal Step One


Proximal Right Main Bronchus
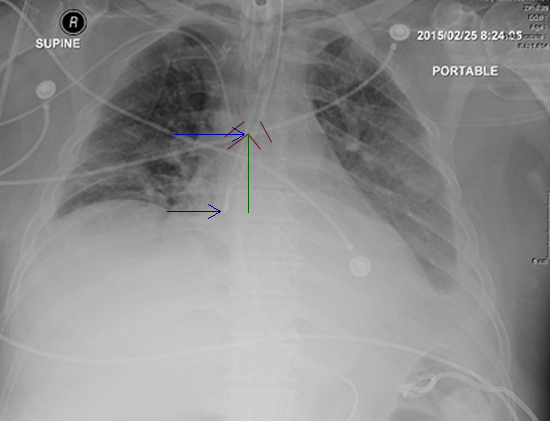
Image 1: Chest Xray successfully rules out airway placement. You can use the ruler (red arrow) to measure the distance of the tip from the carina. Step back to view the darkened area of the trachea and branching of the left and right bronchi. The tip of the feeding tube must be below the level of the carina and it should not follow either airway.    If the tube is more than 5 cm below the carina, it has been advanced more than needed to rule out airway placement.

Image 2: This tube is in the right mainstem bronchus.  The proximal location has successfully identified airway placement, without the harm associated with a more distal advancement.

The tip is less than 5 cm beyond the level of the carina which is optimal. Reattempt insertion after removing the feeding tube completely.  Use this same distance for the next attempt.

Carina and Distance
Image 1b: The carina is identified by the top blue arrow. The green line shows the distance from carina to feeding tube tip.


Menu Bar
Image 3: To determine the distance from the tip of the carina, you can click on the ruler from the Centricity menu bar. Drag the line between the carina and the tip of the feeding tube.  In Power Chart the line length will be displayed as 50 mm (maximum distance from carina = 5 cm). In PAX display you can use the cm markers identified by the red arrow in Image 1.

How to estimate the optimal length for Step One:

1. Look at the Kardex to see if the optimal distance has been recorded from a previous attempt

2. Measure from the tip of the nose to ear to xyphoid process and SUBSTRACT 10 cm from the measured length.

3. Oral route: look at the distance marking for the endotracheal tube and ADD 5 cm.

4. Nasal route: look at the distance marking for the oral endotracheal tube and ADD 10 cm.

Following the initial Xray, look at the distance marking for the feeding tube and compare it to the Chest Xray. There can be a lack of precision in the estimation of the optimal insertion distance, especially on the first attempt. If the first Chest Xray reveals that the tube was advanced further (or not far enough) than needed to rule out lung placement, use the Chest Xray and ruler (shown above in Image 3) to identify the optimal insertion distance for future attempts.

Use this information to recommend the distance for future insertions by adjusting the insertion distance. Record the recommended distance for Step One on the Kardex to inform future insertions. When documented the optimal insertion distance on the Kardex, be sure to identify whether this was an oral or nasal insertion.

Two Examples of Step One Insertion depth that is greater than the Goal:

Step One Too Far


Step One Too Far
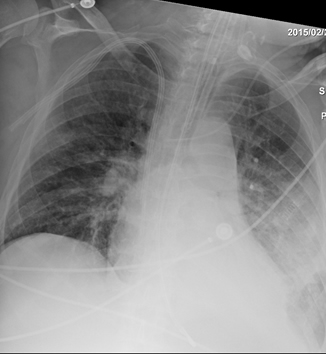
Image 4: Although this Step One Xray rules out airway placement, this tube was advanced further than desired. The tip was in the stomach. If this tube had entered the airway, lung trauma would have been likely. Document the modified insertion distance on the Kardex to inform future insertions.

Image 5: Although the Step One Xray successfully identified right airway placement prior to further advancement, this tube was advanced too far (with greater risk for harm).

Document the modified insertion distance on the Kardex to inform future insertions.


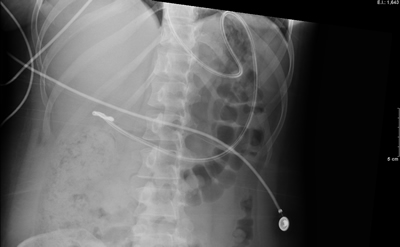
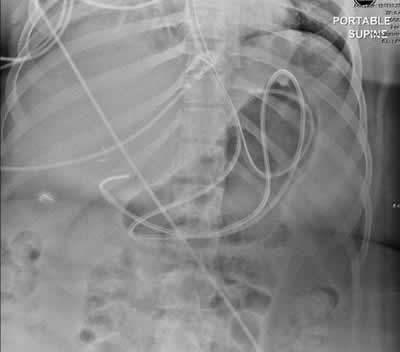
Step Two includes the advancement of the feeding tube, aided by the prior administration of a prokinetic, right sided positioning and administration of air (do not perform any steps that are contraindicated, just perform the ones that are acceptable in this patient).

An abdominal Xray is required following the final advancement, even if the tube was intially observed in the stomach.  Feeding tubes can coil and loop back on themselves and end up with the tip in the esophagus. The only way to ensure that the tube has not kinked backward is via the Abdominal Xray.

Example of Optimal Small Bowel Placement:

Jejunal Placement
Image 6 (above): The feeding tube tip enters the duodenum toward the right. Note that the tube takes a downward turn if it enters the duodenum. The tube continues through the ~ 10 cm of duodenum and turns downward to the left of the sternum as the tube likely enters the jejunum.

Other Examples:


kink at duodenum


Barely Duodenal
Image 7 (above): This feeding tube appears to have entered the duodenum but the tip looks to be kinked. Continued advancement of large amounts of tubing can lead to problems seen in Image 10Image 8 (above): This feeding tube appears to have "turned the corner" into a downward direction that would suggest it is in the very beginning of the duodenum. The hard part is done! Advancing the tube further before removal of the guidewire will usually result in the optimal placement seen in Image 6.


Reason


Extra Loops

Image 9 (above): This Xray reveals the reason why an Xray should be performed after a tube is advanced. This tube has curled back from the stomach and is heading back up the esophagus instead of toward the duodenum.   Feeding here would lead to aspiration. This tube should be pulled all the way back out. Attempts to pull back a few cm will only result in less loop; the tip direction will remain backwards.

Tubes can kink/fold within the bowel and take a backward journey as well.

Image 10 (above): The tip of this tube is curling upward from the point where the duodenum is expected...this is curling in the stomach (a tube that enters the duodenum heads downward). Because the tube did not enter the duodenum and a significant length was added, there is a lot of surplus feeding tube in place.

Several cm of tubing should be withdrawn before the guidewire is removed. Leaving the loop of tubing can lead to knotting.

PROCEDURE FOR INSERTION OF GASTRIC AND SMALL BOWEL FEEING TUBES

 1.

Select Patient

Attempts should be made to insert all feeding tubes into the small bowel during initial placement, using this procedure.

Exception: For patients previously tolerating gastric feeding and requiring frequent feeding tube reinsertions gastric placement is acceptable.

A minimum of two Xrays is required for safe placement of all feeding tubes. If initial attempts to place a feeding tube into the small bowel results in gastric placement, initiate feeding via the gastric route, assess for tolerance and re-evaluate the need for small bowel placement.

Contraindications to ORAL or NASAL tube placement by nurse:

  • Esophageal varices (contact GI)
  • Esophageal surgery, e.g., esophagectomy (contact surgical team)
  • Recent ear nose and throat or gastric surgery (contact surgical team)
  • Recent GI bleeding (contact GI or surgical team)

Contraindications to NASAL tube placement:

  • Nasal fractures
  • Anterior basal skull fracture
  • Sinusitis
  • Epistaxis
  • If INR > 2.0, review with physician to consider appropriateness of correcting INR to facilitate nasal insertion. If INR is prolonged and there is no contraindication to oral tube placement (above), use oral route for tube insertion (nurse may insert orally).

A feeding tube that sits in the small bowel results in improved tolerance of feeds and better absorption of nutrients. It may decrease the risk of aspiration in some patients. Bedside placement of small bowel feeding tubes (SBFT) may facilitate earlier feeding (1, 2, 3).

 2.

Obtain Order

Rule out contraindications to feeding tube insertion and check for allergies/sensitivity to erythromycin. Rule out significant QT prolongation (contraindication to erythromycin).

Obtain an order to:

  • Insert a small bowel feeding tube
  • For prokinetic if desired:

    Metoclopramide 10mg IV 10 minutes before advancement from the stomach to small bowel or erythromycin 500 mg in 100 ml IV over 30 minutes (central administration) or 60 minutes (peripheral administration)

Erythromycin has been shown to stimulate gastric motility and facilitate gastric emptying (3) and metoclopramide has been reported to enhance feeding tube advancement (4). Metoclopramide has been changed to the first line agent (previously erythromycin) due to antimicrobial stewardship program and ease of administration. Consider erythromycin where there is a high need for small bowel placement and/or prior failure.   

Contraindications to administering erythromycin include allergy or sensitivity. Caution should be used in patients with hepatic insufficiency.  Although both erythromycin and metoclopramide may cause prolongation of the QT interval, the risk for prolongation with a single dose is relatively low. Both drugs are containdicated if significant preexisting prolongation is present.

QT is prolonged if the distance from the beginning of the QRS to the end of the T wave is > 50% of the R to R interval (or the QTc is prolonged to > 450-500).

 3.

Collect Supplies  

  1. Feeding tube
  2. Slip tip 60cc syringe
  3. Water for flushing feeding tube
  4. Water soluble lubricant (recommend Urojet)
  5. Stethoscope
  6. Tape for securing feeding tube
  7. Gloves
  8. PPE- non-sterile gloves, assess risk for gown and facemask with shield if required

 4.

Prepare for Insertion

Explain procedure to patient and family

ALL feeding tube insertions require a minimum of 2 Xrays.

If any of the recommended steps are contraindicated, attempt feeding tube insertion with the strategies that are acceptable for this patient.

If patient has a nasogastric or oral gastric tube in place, it should be removed prior to insertion of the feeding tube as it may interfere with the ability to 'corkscrew' the feeding tube into final position (5).

 5.

Adjust Bed

Patient should be in supine, upright position with HOB ~45 degrees as tolerated (unless contraindicated) to facilitate the intitial advancement into the stomach.

6.

Measure Placement for First Step Advancement

How to estimate the optimal length for Step One:
The goal for the initial step is to pass the feeding tube into the esophagus with the tip about 5 cm below the level of the carina. Insertion to 30-35 cm is usually optimal for most patients.

1. Look at the Kardex to see if the optimal distance has been recorded from a previous attempt

2. Measure from the tip of the nose to ear to xyphoid process and SUBSTRACT 10 cm from the measured length.

3. Oral route: look at the distance marking for the endotracheal tube and ADD 5 cm.

4. Nasal route: look at the distance marking for the oral endotracheal tube and ADD 10 cm.

7.

Prepare Feeding Tube

  1. Dip the tip of the feeding tube in water.
  2. Secure stylet tightly into the feeding tube.
  3. Flush the tube with water.
  4. Flush out water with air. 
  5. Add extra lubricant to tip of tube.

The stylet provides tube stiffness to facilitate advancement. Flushing activates the lubricant for the tube. The water is flushed out to decrease the risk of inducing coughing, especially if the tube enters the airway. Extra lubricant facilitates easier insertion.​​​​​​

8.

Begin Insertion

Connect the empty syringe to the guidewire end of the feeding tube. Be sure the feeding tube is firmly inserted and the connection is tight. Cap the medication port at the Y connection.

Utilize the oral route if nasal route is contraindicated (e.g., head injury, sinusitis) or if nasal resistance is met bilaterally.

If the patient has an NG/OG tube in place, identify whether gastric drainage will continue following small bowel placement of the feeding tube. Ideally, remove the NG. If the NG/OG is to remain in place, review the X-ray to ensure the NG/OG tip is well away from the entry to the duodenum. If the NG/OG is low, withdraw until it is higher in the fundus (it can be readvanced before the final Xray).

If the gastric drainage tube is not being removed, it should be clamped during insertion.  You will be adding air during the advancement.

Gently insert the well lubricated tip of the feeding tube into one nare. If the tube cannot be advanced into the nasopharynx, gently manipulate the tip of the nose (upward and/or side to side) and reattempt. If resistance is met, attempt insertion into the other nare.  Do not force the tube. 

If possible, flexion of the chin toward the chest can open up the nasal channels and make the initial insertion easier.

Once the tube is in the pharynx, ask the patient (if able) to swallow and while slowly advancing the tube. If the patient is not intubated and has an intact gag reflex, you may provide a sip of water to aid in swallowing. If the patient continually coughs or his/her oxygen saturation drops during tube advancement, withdraw the tube and reattempt.

When the tube has been advanced to the ~30 - 35 cm mark, try to aspirate. If you aspirate air, you are likely in the trachea (unless the connection is loose). If you feel a resistance when you draw back on the plunger and it then returns to its original position when released, you are likely in the esophagus (6)

CAUTION:

Be careful not to advance the tube beyond 30-35 cm, especially in patients at the highest risk for harm from iatrogenic pneumothorax (e.g. patients with lung surgery, severe COPD or lung compromise). The tube can be advanced further while the patient is on the Xray plate this is not far enough to clear the carina.

Obtain a Chest Xray to rule out airway placement.

9.

Advance to Esophagus

Advance the tube to predetermined marking. Usually 30-35 cm is sufficient.

Airway placement must be ruled out before the tube is advanced into the stomach or small bowel. This 2-step X-ray method protects the patient from harm should the tube be inadvertently placed into an airway. By limiting the intitial advancement to 35-40 cm, inadvertent airway placement would still be in the large airways and unlikely to cause harm.

10.

Confirm Placement in the GI tract

Have X-ray assessed to RULE OUT airway placement.  Remind resident to evaluate Xray using usual approach and ensure there are no lung complications such as pneumothorax. 

Identify the carina on the X-ray. Follow the feeding tube. If the feeding tube follows the path of the trachea and continues into the right or left bronchus, airway placement has occurred (see below before removal).

GI placement is identified if the tube travels straight down below the carina. 

Use the electronic ruler in the Xray viewer to determine the amount of feeding tube that extends below the carina. The optimal placement is below the carina, but not greater than 5 cm below the carina.

If the tip location is within this distance, record the distance marking on the Kardex. Identify whether this was a nasal or oral insertion site. This marking can be used to inform future insertions.

If the Xray reveals a tip placement that is lower than desired, measure the surplus length and subtract this from the recommended catheter length for future insertions.

IF FEEDING TUBE IS IN THE AIRWAY:

Fully remove the tube and start the procedure again. Pulling the tube back to the nasopharynx may results in the next attempt also following the airway. Double check the distance to ensure that the tube has not been advanced beyond the ideal. Ensure that this and subsequent xrays are examined closely by the resident to ensure there is no pneumothorax.

Pneumothoraces induced by feeding tubes often cause symptoms upon removal (if the tube was not restricted to the proximal airway). The physician should be notified and and prepared to manage a pneumothorax during tube removal if the tip is in the lung.

11.

Position the Patient for Advancement of the Tube into the Small Bowel

Small bowel placement success is promoted by bundling all of the following success strategies.  If any of these steps are contraindicated, implement to steps are acceptable for this patient.

1. Following radiographic confirmation that the feeding tube has not migrated into an airway, advance the feeding tube an additional 20 cm into the upper stomach. Do not advanced beyond this point prior to administration of prokinetics, to avoid curling in the stomach.

2. Position the patient as far over to the right as possible with the HOB elevated. This encourages emptying toward the duodenum.

3. Administer prokinetic with patient on right side. Infuse erythromicin over 30 minutes (for central line) or 60 minutes (peripheral line) on the right side, with head of bed elevated. Maxeran can be given IV direct.

4. As soon as administration of the prokinetic is finished, prepare to advance the tube as follows:

  • Instill 250-500 cc of air into the stomach to expand the stomach and pylorus
  • Slowly and gently, advance the tube in 10 cm increments, using a corkscrew/twisting motion to aid advancement into the small bowel. Pause at each increment. You may detect resistance or a "pop" as the tube passes through the pylorus.
  • Continue to advance until approximately 80-100 cm of feeding tube has been inserted. If the tube has not entered the duodenum by that point any additional tube advancement will curl in the stomach. This may cause the tube to travel back up the esophagus or increases the risk that the tube may become knotted after the wire is removed.
12.

Perform Abdominal Xray (Step Two)

Review the abdominal Xray with the resident, ideally while patient is still on the Xray plate. If the tube has passed through the pylorus, continue to advance the tube until resistance is met or the tube is fully inserted.  Repeat a second Xray while the patient is still on the plate.

If the tip has curled into the stomach in stead of the duodenum, initiate feeding by gastric tube and monitor for tolerance.

Review final placement with resident; resident enters confirmation of Xray placement and identifies whether gastric or small bowel placement of tip. Do not initiate feeding until confirmation has been obtained and documented (a verbal order can be accepted).

13. 

Complete Feeding Tube Insertion

Gently flush the feeding tube with the wire still in place. This will loosen the wire and reduce the chance of feeding tube displacement during wire removal.

Remove the wire, secure the tube and update the Kardex with the feeding tube length and tip placement.

14. 

Document

Document GI assessment including bowel movements in IView Gastrointestinal System.

Create a Dynamic Group under Devices Band. Under Activity field, selects inserted. This will document the insertion date. 

Document Qshift and PRN tube assessment in the Device Band.


Last Updated: February 2, 2021; Reviewed January 31, 2024
Brenda Morgan  MSc RN CNCC, CCTC

REFERENCES


1. Powers J, Chance R, Bortenschlager L, et al. Bedside placement of small-bowel feeding tubes in the intensive care unit. Critical Care Nurse. 2003; 23:16-24.

2. Lenart S, Polissar NL. Comparison of 2 methods for postpyloric placement of enteral feeding tubes. American Journal of Critical Care. 2003; 12:357-360.

3. Griffith DP, McNally AT, Battey CH, et al. Intravenous erythromycin facilitates bedside placement of post pyloric feeding tubes in critically ill adults: A double-blind, randomized placebo-controlled study. Critical Care Medicine. 2003; 31:39-44.

4. Booth, CM., Heyland, DK., Paterson, WG. (2002). Gastrointestinal promotility agents in critical care: A systematic review. Crit Care Med. 2002 Jul;30(7):1429-35.

5. Zaloga GP, Roberts PR. Bedside placement of enteral feeding tubes in the intensive care unit. Critical Care Medicine. 1998; 26:987-988.

6. Carroll GC. A Technique that improves the safety of feeding tube insertion. Critical Care Medicine. 2003; 31:1603-1604.

7. Thurlow PM. Techniques, materials and devices: Bedside enteral feeding tube placement in duodenum and jejunum. Journal of Parenteral Enteral Nutrition. 1986; 10:104-105.

8. Zaloga GP. Bedside method for placing small bowel feeding tubes in critically ill patients: A prospective study. Chest. 1991; 100:1643-1646.