Ensure that patient and health care provider safety standards are met during this procedure including:
- Risk assessment and appropriate PPE
- 4 Moments of Hand Hygiene
- Procedural Safety Pause is performed
- Two patient identification
- Safe patient handling practices
- Biomedical waste disposal policies
Purpose:
Defibrillation is the treatment for ventricular fibrillation. The success of resuscitation of patients with ventricular fibrillation relates to how quickly electrical energy can be applied to the myocardium. The longer the heart fibrillates, the greater the myocardial oxygen consumption and deterioration of myocardial function. The chance of successful defibrillation is reduced as the fibrillation time increases.
Equipment Required:
- Crash cart with Zoll biphasic defibrillator
- Multipurpose pacing/defibrillation pads
- PPE- non-sterile gloves, gown and facemask with shield (assess risk for need of gown and facemask with shield)
Index:
New Zoll R Series Defibrillators:
Link to Educational Material for New Zoll R Series Defibrillator-Pacemaker includes a series of brief video tutorials.
Procedure | |||||||||||||
| 1. | Identify Life-Threatening Rhythm A certified critical care nurses may initiate defibrillation under the following circumstances:
Note: Arterial line pressures < 60 mmHg may be associated with pulselessness. CPR should be initiated immediately. Successful conversation of these rhythms occurs with rapid delivery of the first shock of energy. Pulseless VT is often short-lived and deteriorates to VF. | ||||||||||||
| 2. | The first responder initiates CPR until the defibrillator arrives. Use the following sequence:
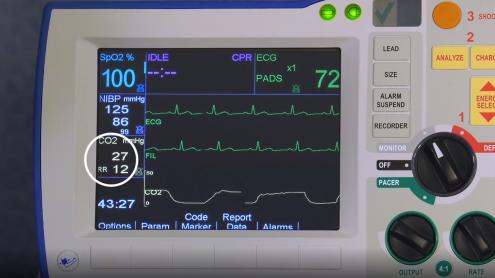
Effective Compressions Position hands on the sternum at the nipple line. Perform chest compressions at a rate of 100 - 120/minute to a depth of 5 to 6 cm (2 - 2.5 inches) of chest wall diameter. The new Zoll R series has a compression pad that provides real time feedback on the quality of CPR. During CPR, minimize interruptions of compressions and allow for good chest recoil. Whenever feasible, switch the person who is performing compressions after each 2 minute cycle (the effectiveness of CPR decreases beyond this). CPR during Pregnancy: Use the same hand positions for pregnant patients as non-pregnant (no longer recommended to move them to a more cephalic placement during pregnancy). A second person is required to maintain continuous manual left uterine displacement with patient in the supine position (see Obstetrical Emergencies). If standing on the right of the patient, one hand is used to push the uterus towards the left. If the assistant is standing to the left of the patient, two hands are used to pull the uterus towards the left. End-Tidal CO2 Should be initiated at the onset of bagging and intubation. ETCO2 is now displayed on screen with the Zoll R series. End-Tidal CO2 Benefits:
| ||||||||||||
| 3. | Call a code blue simultaneously with initiation of CPR. In CCTC, activated the bedside emergency call button and call for critical care physician STAT. | ||||||||||||
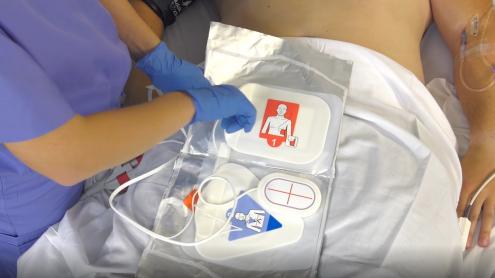
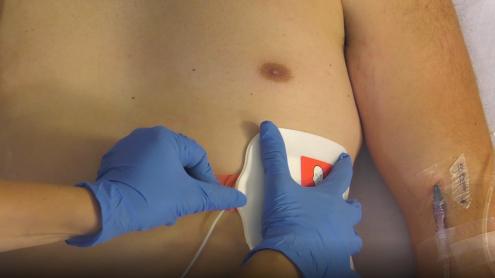
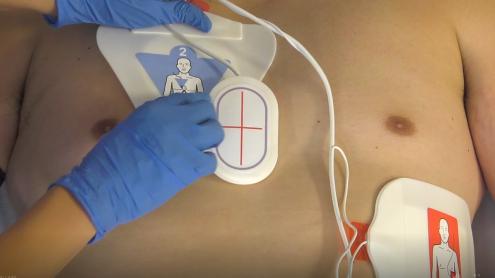
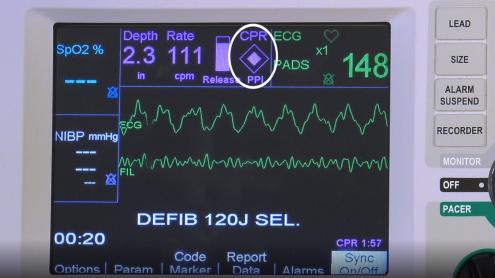
| 4. | Prepare Patient for Defibrillation Initial defibrillation: Apply One Step CPR 1 A/A Multifunctional pads. The pads should be connected to the Zoll and the package unopened. Before starting, confirm that the pads and machine have passed their self-test and are ready to open and use. If CPR is in progress, apply the gel pads in the Anterior - Anterior position. Anterior-Anterior Placement Apply Pad #1 first to the left chest position. Position below the pectoral muscle as shown on pad diagram. For female patients, lift the breast and position on top of the pad once it has been applied. Pad #2 is attached to a CPR sensor. Position the CPR sensor so that the red vertical line is mid-sternum and the blue horizontal line is aligned with the nipple. Press the right pad into position as shown on the pad diagram.
Anterior-Posterior Placement The OneStep CPR 1 A/A Multifunctional pads can be used for anterior - posterior placement. Separate the right chest pad from the CPR sensor. Apply the right chest pad to the left posterior chest first (to prevent wrinkling of the anterior pads. Apply the apex pad as shown above. Apply the apex pad as shown above.
ECG Electrodes Apply the Zoll ECG electrodes. The One Step Multifunctional pads can monitor, shock and pace, but they cannot read the ECG at the same time that they pace or cardiovert. The ECG must be connected to the Zoll to provide sending and rhythm feedback. Paddles are no longer available on the Crash Carts.Prepare Patient:
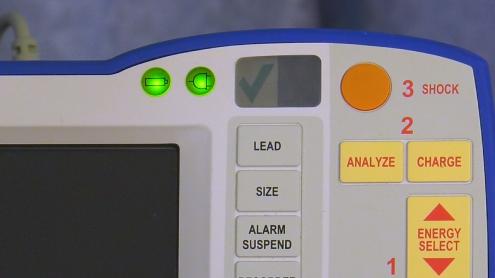
Position for Pacemaker/Defibrillator Pads: Safety: OneStep CPR 1 A/A Multifunctional pads are attached and ready to open and apply on all Crash Carts. When the unopened package is connected to the Zoll R, they perform ongoing self-tests to ensure functionality. The package must remain unopened for the self-test to work. Confirm that the pads and machine are functional prior to use by confirming the check mark is visible in the display window. The CPR A/A pads can be applied either in the Anterior-Posterior position or Anterior-Anterior, however, during CPR they should be applied Anterior-Anterior for speed. When pads are applied Anterior-Posterior, apply the posterior pad first to avoid wrinkling of the anterior pad. Do no place pads over ECG electrodes. Arcing will occur if shock is delivered too close to electrodes. | ||||||||||||
| 5. |
Ensure the pads do not come in contact with ECG leads. The only treatment for fibrillation is delivering electrical current immediately to the myocardium. Biphasic defibrillators are more successful at converting VF with the first shock. | ||||||||||||
| 6. | Ensure that there is no contact with any metal objects and no one is in contact with the patient or bed. Call "All Clear". | ||||||||||||
| 7. | Discharge energy by simultaneously depressing the SHOCK button on the paddles or monitor (second person). Deliver shock following exhalation. Air filled lungs decrease electrical conduction. Patient may be in a respiratory arrest. | ||||||||||||
| 8. |
Continue CPR immediately after shock; this provides myocardial oxygenation which improves shock success. Higher respiratory rates increase intrathoracic pressure which decreases perfusion of organs. Safety: If multipurpose pads have been charged and are no longer required, do not discharge the energy into the machine or the air. To safely discharge the pads, turn the dial on the machine from "defib" to "monitor" to discharge the energy. Confirm that the energy has been discharged before removing the pads from the chest. | ||||||||||||
| 9. |
| ||||||||||||
| 10. | While CPR is being performed, administer epinephrine 1 mg IV direct after the second defibrillation. A certified critical care nurse may give epinephrine 1 mg IV direct after the second defibrillation shock has been delivered by Medical Directive. The certified critical care nurse may repeat epinephrine 1 mg IV direct every 3 minutes until Return of Spontaneous Circulation (ROSC). If the patient does not have IV access, epinephrine may also be given by a certified critical care nurse by Medical Directive down the endotracheal tube. Epinephrine may be ordered earlier by a physician during the cardiac arrest. This will require an order as it is outside the Medical Directive. Epinephrine can increase cerebral and coronary perfusion pressures by alpha vasoconstriction. Delivery of drug during compressions minimizes interruptions to CPR. | ||||||||||||
| 11. | Consider Causes for Non-Responsiveness Return to step # 8-9. Consider H's and T's Hypovolemia | ||||||||||||
| 12. | While CPR is being performed, administer amiodarone 300 mg IV direct per amiodarone procedure. If contraindicated, administer lidocaine 1 mg/kg per defibrillation procedure under medical directive. A certified critical care nurse may give lidocaine by Medical Directive if amiodarone is contraindicated at a total bolus dose of 1.5 mg/kg (preloaded syringe). An order is required to initiate an amiodarone or lidocaine infusion. | ||||||||||||
| 13. | Maintain ABC’s. Return to Step #11 Administer Epinenphrine Continue CPR as per step # 9 followed then by step # 10. | ||||||||||||
| 14. | The priority during resuscitation of the pregnant patient is the mother. Activate Code OB STAT and early (as soon as patient shows signs of deterioration in condition). Code OB is available at Victoria Hospital only. At UH, page a general surgeon STAT for perimortem cesarean: Follow standard ACLS algorithms with the following modifications:
Causes for Maternal Cardiac Arrest (Beauchops) B Bleeding/DIC | ||||||||||||
| 15. | Document in cardiac arrest record. | ||||||||||||
| 16. | The medical directive for ACLS provides the authority to initiate interventions. The RN who initiates the medical directive should be identified in the cardiac arrest record. |
References:
American Heart Association. 2015 & 2018 Integrated ACLS Guidelines
American Heart Association. 2023 ACLS highlights.
Last Update: November 5, 2018, February 10, 2020 (KK/BM); Reviewed January 22, 2021, Revised January 17, 2025