PROCEDURE FOR INSERTION OF A CODMAN MICROSENSORTM EVD OR INTRAPARENCHYMAL ICP AND SETUP OF THE CODMAN EXPRESSTM
Introduction: The Codman MicrosensorTM measures intracranial pressure via a strain gauge microchip located at the tip of the catheter. Pressure is reflected as an electrical voltage that is transmitted to the proximal end of the catheter through nylon encapsulated copper wires. The proximal end of the catheter is connected to the Codman ExpressTM monitor, which displays the intracranial pressure measurement (ICP). Pressure is measured independent of any fluid filled channel.
There are two different types of Codman ICP MicrosensorsTM. Both microsensor catheters are zeroed and connected to a Codman ExpressTM using the same way.
Codman Intraparenchymal CatheterTM
The intraparenchymal catheter is a thin catheter inserted into brain tissue (parenchyma), just below the level of the dura. It can only be used for pressure monitoring. It does not contain any drainage or fluid filled lumen. Pressure at the tip (in the brain tissue) is measured using the Codman Intraparenchymal MicrosensorTM (Figure 1.01).
Codman EVD MicrosensorTM
This catheter is similar to a conventional fluid filled ventricular drainage catheter. It is inserted into the ventricle, has a drainage lumen to allow removal of CSF, and can be connected to a fluid filled pressure monitoring system to measure intraventricular pressure if a Codman ExpressTM monitor is unavailable.
This catheter differs from the standard fluid filled drainage catheter by having a Codman MicrosensorTM located at the catheter tip. This allows pressure to be measured at the tip of the ventricular catheter by the same strain gauge technology as the intraparenchymal model. Pressure measurement with the MicrosensorTM is not influenced by patency of the fluid pathway. It is connected to the Codman ExpressTM pressure monitoring unit.
Because this catheter is both a pressure monitoring device and an intraventricular drainage catheter, the catheter will also need to be connected to an external ventricular drainage unit (Codman EDS 3TM ) as well as the Codman ExpressTM monitor.
This procedure provides instruction for set-up, zeroing and calibration of the intraparenchymal or the external ventricular Codman MicrosensorTM catheters.
Figure 1.02: The white connector of the ICP microsensor is connected to the cable of the Codman Express monitoring using.
A cable connected between the Codman ExpressTM and the bedside monitor is required to display a waveform onto the bedside monitor. It is important to remember that the pressure is measured by the Codman ExpressTM and copied to the bedside monitor. Therefore, the Codman ExpressTM is the source of truth.
Figure 1.03: A monitor cable connected between the back of the Codman Express to the bedside pressure module is used to slave the pressure to the bedside display. In CCTC, this cable should remain attached to the back of the Codman Express.
Equipment:
Personal protective equipment (PPE)
Sterile towels
Sterile ventricular drain tray including disposable drill
Hair clippers
Codman MicrosensorTM EVD or Intraparenchymal ICP
Codman ExpressTM monitor with microsensor cable (should be attached to front of Codman ExpressTM). Be sure that any label with previous reference codes have been removed.
Cable to connect Codman ExpressTM to bedside monitor (should be attached to back of Codman ExpressTM)
Sterile occlusive dressing (TegadermTM)
Topical anesthetic
Suture
IV pole
Primed Codman EDS 3TM if a ventricular drainage unit is being inserted
Explain procedure to family and prepare them for additional equipment and patient appearance.
2.
Prepare Equipment
Gather listed above equipment.
Ensure electrical cord connected and plugged in to red electrical outlet at patient’s bedside.
Secure Codman ICP Express monitor to separate IV pole and position at head of bed.
Hand Hygiene and obtain personal protective equipment.
Have primed drainage Codman EDS 3TM ready to connect if an EVD is being inserted.
ICP Express monitor has no battery power. Red outlets are connected to auxiliary electrical power in case of power failure.
Positioning of set at head of bed prevents accidental dislodgment of catheter.
3.
Connect Microsensor Cable
Connect the Codman MicrosensorTM cable to the Codman ExpressTM. This is the cable that will connect to the patient catheter. It connects at the front of the Codman ExpressTM where is should be permanently attached.
Figure 1.04: Connect microsensore cable to front of monitor.
4.
Plug In Monitor Cable
Plug the monitor cable into the front of a bedside pressure module. The special CodmanTM-PhilipsTM pressure cable should remain securely connected to the back of the Codman ExpressTM between patients. This will slave (make a copy) the pressure measured by the Codman ExpressTM to the bedside monitor where it will be converted to an ICP waveform.
Figure 1.05: Slave the pressure to the monitor
5.
Activate Codman ExpressTM Pressure Monitor
Turn on ICP Express by pressing “On/Off” key located at front of monitor. An audible tone will be heard. The monitor will conduct self-diagnostic tests. If any errors are detected during self-test period, the monitor will display an error message. Unplug monitor and send to Biomed for service.
Figure 1.06: Turn the Codman Express on.
Activate the pressure module on the PhilipsTM bedside monitor and label it ICP. These steps are outlined in the Checklist for Insertion of Codman Microsensor and ExpressTM.
6.
Zero the bedside monitor
To zero the monitor monitor, follow these steps:
Press the Menu/Enter button (white) to confirm that you want to zero the bedside monitor.
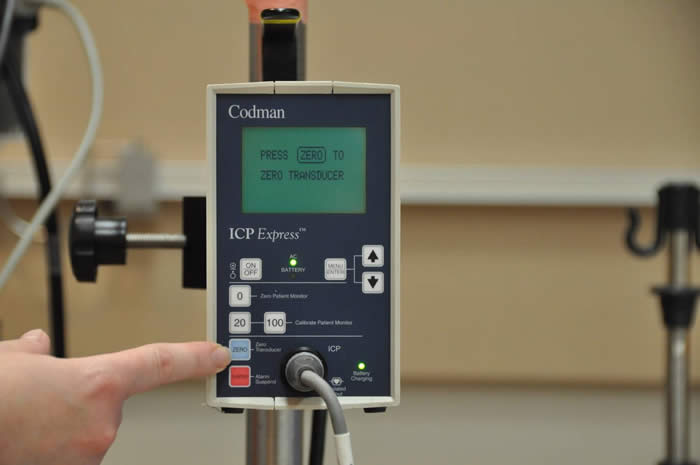
If the Codman ExpressTM does not immediately prompt you with the message "Proceed to zero monitor" (Figure 1.07), press the white "0" (zero monitor) button on the Codman ExpressTM. This step is the equivalent of opening up the stopcock to atmospheric air on a regular transducer in preparation for zeroing.
When the Codman ExpressTM displays the message "Proceed to zero monitor", select the zero the ICP option on the PhilipsTM monitor.
Watch the waveform on the PhilipsTM monitor and wait until it has fallen to "0". It should be sitting on the "0" line of the scale. If the bedside monitor does not fall to 0, repeat the zeroing steps above .It can take a minute to find 0.
Press the white "Menu/Enter” key on the Codman ExpressTM monitor to complete the zeroing proces (this confirms that the PhilipsTM monitor recorded a pressure of zero as zero).
The system must be zeroed to ensure the Codman pressure is correctly displayed on the bedside monitor.
Figure 1.07: Initiate bedside monitor zeroing.
7.
Calibrate Pressure
Instructions will appear on the Codman ExpressTM to calibrate the bedside monitor. The screen will prompt the user to choose either 20 or 100 mm Hg (Figure 1.08). Press the 20 key to send a pressure signal to the bedside monitor. If the bedside monitor correctly measures this signal, the bedside monitor will display a pressure of 20. The ICP scale should provide a visual depiction of 20. It can take a minute or two for the pressure to reach 20. If this does not happen after a couple of minutes, repeat the zeroing and calibration steps. If repeated calibration attempts fail, the monitor Codman Express requires service.
Once the calibration is complete, press the white “Menu/Enter” key to continue. 20 mm Hg is the calibration selection for pressures that will measure < 100 mm Hg.
Figure 1.08: Choose 20 when calibrating.
8.
Proceed with Insertion and Connect the Microsensor Cable
The physician can now prepare the sterile field and open the Codman MicrosensorTM catheter (either the intraparenchymal or EVD microsensor). Hair clipping should be performed before the tray is opened. T
he physician hands the microsensor connector to the nurse for connection to the microsensor cable (Figure 1.09). This must be done before catheter insertion. The catheter must be zeroed while submerged under water, prior to insertion. You cannot zero the catheter after insertion.
Figure 1.09: Connect the microsensor.
As soon as the microsensor is connected, a message "transducer detected" should be displayed (Figure 1.10).
Figure 1.10: Transducer detected message
Connection of the patient catheter to the cable is necessary to zero the catheter prior to insertion. The monitor must be zeroed to atmospheric pressure before insertion.
9.
Prepare Catheter
Using the Codman MicrosensorTM basic kit, the physician will lay 3” of the tip of the microsensor catheter flat into sterile water or saline. Do not submerge the catheter vertically (Figure 1.11). The catheter must remain wet during the zeroing process. The physician must hold the catheter steadily during the zeroing procedure.
Figure 1.11: Catheter position for zeroing.
10.
Zero the Patient Catheter
Press the blue “Zero” key on the Codman ExpressTM unit (Figure 1.12) while catheter is maintained under water, without movement. “Transducer zeroing in process (please wait)” will appear in the display window.
Figure 1.11: Press blue zero button to zero microsensor.
Once zeroing is complete, a 3 digit number offset number will display in the ICP express display window.
Figure: 1.13: 3 Reference number (519) being displayed. This number must be recorded in the chart and recorded onto the top of the Codman Express unit for future validation.
RECORD THIS NUMBER ON THE WHITE CATHETER CONNECTOR USING PERMANENT BLACK MARKER PEN. Document in the AI record and enter a communication order in Power Chart: "Codman Zeroing Reference is xxx".
This offset value is required for reconnection if the monitor is disconnected from the patient, or if the patient is connected to a different Codman Express monitor. This value is required to zero the new system and is specific to the catheter being used.
11.
Complete Zeroing and Insert Catheter
Press the “Menu/Enter” key to continue. The catheter/microsensor is now ready for the insertion of the patient's ICP catheter.
12.
Assist with Catheter Insertion
Once catheter is inserted, reconfirm the drainage level and position of drainage collecting chamber.
13.
Apply Dressing
Apply a dressing over the site (gauze or occlusive depending upon the presence of drainage).
Change dressing prn. May leave dressing off when drainage has stopped.
14.
Document
Document hourly ICP from ICP Express on neurological section of the nursing flowsheet. Record hourly neurovital signs, and calculate and document the Cerebral Perfusion Pressure (CPP).
15.
Discard Medical Waste
Discard used equipment and supplies. Remove PPE and perform hand hygiene. The patient requires a CT to confirm placement if an EVD was inserted.
16.
Prepare for CT
To transport the patient from CCTC, disconnect the bedside monitoring cable. The patient can remain connected to the Codman Express during transport and CT.
MRI: Both the white microsensor connection and the EDS 3TM drainage system are MRI compatible. The monitor and Codman ExpressTM microsensor cable must be disconnected before entering the MRI suite.
To disconnect the microsensor, pull the white microsensor apart from the Codman ExpressTM connection cable.
Transporting the Drainage Collection Unit
If the patient has a ventricular drainage system, transport the EVDS 3TM with the patient.
During transport, position the drain at the ordered level and keep it open. Patient movement or transfer may cause the patient's ICP to increase if they already have intracranial hypertension.. Keeping the drain open at the appropriate level may be protective.
The drain should only be turned off if the drainage chamber has to be lowered below the patient head. The drainage chamber should be reopened as soon as the level of the drain can be corrected.
If the drain is positioned below the patient's head, over drainage of the ventricles may occur. Rapid and/or excessive drainage can cause intracranial hemorrhage and disequilibrium syndrome. Turning the stopcock off will prevent accidental over-drainage if the drainage unit must be temporarily lowered.
If the drain is positioned at a level higher than ordered, drainage will be prevented unless the ICP increases to exceed that higher level. A significant elevation in the height of the drain would be similar to clamping the drain. Restoring the drain level during transport is important to prevent worsening of any intracranial hypertension.
It is important to recognize that stimulation and repositioning associated with patient transport could cause the ICP to elevate. The best way to manage this is to quickly restore the drainage collecting chamber to the ordered level and drainage position as soon as possible.
DO NOT lay the drainage collection unit on the bed or in a horizontal position. This can lead to wetting of the filter and obstructed flow.
17.
Reconnecting the Codman Express
To reconnect a patient to the Codman ExpressTM you will need the 3 digit reference number that was assigned at the time of insertion.:
Reconnect the microsensor to the Codman ExpressTM cable
Press the "menu/enter" button
Select the "manual zero" option
Check the displayed reference number. If it matches the 3 digit number that was recorded at the time of insertion, select the "menu/enter" button.
If the reference number is different, use the arrow buttons to change the reference number to match the insertion code and select "menu/enter"
Press the white "zero" button (zero monitor).
When "Proceed to zero monitor" appears on the Codman display, press the "zero" button on the bedside monitor
Wait until the pressure on the bedside monitor reads "0", then select the "menu/enter" button to confirm
The 3 digit reference must be confirmed to ensure accurate pressure readings. This code is catheter specific. A different Codman ExpressTM unit can be connected, but you will need to ensure that the reference code is adjusted appropriately.
Be sure to remove any code label from the Codman ExpressTM after removal of the catheter.
18.
Documentation
In IView, select the Adult ICU Lines - Devices Navigation Band. If you do not have Intracranial/Lumbar Monitor and Drain as an option, select it from custom view. Select the Intracranial/Lumbar drain type and create a Dynamic Group. Ensure that the Codman 3 digit offset code is documented in the Intracranial/Lumbar Dynamic Group, as well as any pressures/or hourly output.
Create a Dynamic Group for documentation of ICP or CSF drainage.
Developed: June 12, 2008
Revise Date: February 1, 2020 (BM); Last reviewed February 4, 2021; Revised, January 17, 2025