Procedure: Partial Withdrawal of a Pulmonary Artery Catheter
Ensure that patient and health care provider safety standards are met during this procedure including: - Risk assessment and appropriate PPE
- 4 Moments of Hand Hygiene
- Procedural Safety Pause is performed
- Two patient identification
- Safe patient handling practices
- Biomedical waste disposal policies
|
This procedure is for use by nursing staff in CCTC who are approved to partially withdraw a pulmonary artery catheter. PROCEDURE FOR PARTIAL WITHDRAWAL FROM A WEDGED PLACEMENT |
|---|
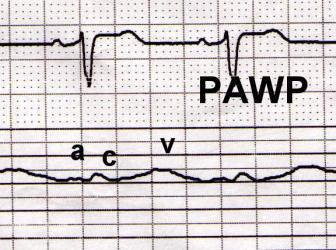
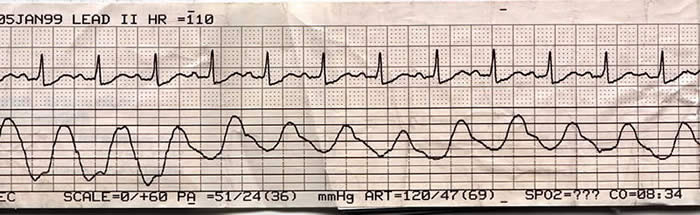
1. | A persistent wedge waveform is identified on the PA tracing. - The pulmonary wedge pattern will have two low pressure waves per cardiac cycle ("a" and "c") if the patient is in a sinus rhythm. It has the same morphology as a CVP but may have more respiratory or movement artifact.
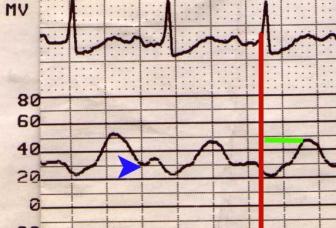
- The pulmonary artery waveform will typically have evidence of a dicrotic notch (blue arrow), and produce one tall waveform following each QRS.
- A persistent wedged pattern indicates that the catheter has migrated into the pulmonary arterial circulation to a position where the lumen of the artery is equal to the diameter of the catheter. This obstructs blood flow and may compromise blood flow to the lung tissue.
- When the catheter is optimally positioned, it should take 1 - 1.5 cc to produce a pulmonary wedge; smaller volumes suggest that the catheter is too distal.
| | |
|
| | Figure 1: Pulmonary Artery Wedge | Figure 2: Pulmonary Artery |
| 2. | Troubleshoot system to confirm pulmonary wedge versus damp or low pressure system: - Ensure that the balloon has not been inflated and locked
- Rule out overall hypotension
- Confirm adequate volume and pressure on flush system
- Assess circuit for air, clot or loose connection
- Increase size of wave to assess for a, c and v eaves
- Flush with caution; aggressive flushing should not be done if catheter is in wedge position
- Check transducer position, flush tranducer and rezero
- Assess distance marker (catheters can migrate to PWP or slip back to the ventricle without any change in the insertion marker
| 3. | If the tracing is confirmed as "wedged", check to ensure that the balloon is deflated. Reposition patient and have patient cough/suction to see if spontaneous repositioning is possible. | 4. | Slowly withdraw the catheter while continuously observing for a change in the waveform to the pulmonary artery position. As soon as a PA tracing is observed, stop withdrawing. - Following return of the pulmonary artery tracing, slowly inflate the balloon and assess the pulmonary artery wedge pressure.
- If it takes less than 1 cc to inflate the balloon, carefully withdraw the catheter an additional .5 - 1 cm.
- Recheck the pulmonary wedge.
| 5. | Monitor waveform closely for right ventricular or spontaneous wedge tracing. If a right ventricular tracing is noted, withdraw the catheter to the right atrium as per procedure below. - If the catheter is withdrawn too far, it could slip into the right ventricle. Prompt withdrawal to the right atrium will ensure catheter is in a safe position.
- The catheter could return to a spontaneous wedge pattern, requiring further adjustment.
| | 6. | Notify the physician. | 7. | Document in the clinical record. |
PROCEDURE FOR PARTIAL WITHDRAWAL FROM A RIGHT VENTRICLE PLACEMENT |
|---|
PROCEDURE |
|---|
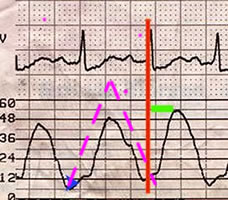
1. | Identify right ventricular tracing on monitor. The right ventricular waveform can be differentiated from the pulmonary artery waveform by the following criteria: - The PA and RV waveforms have the same systolic pressures but the RV has a much lower diastolic pressure (compare the hourly PA systolic/diastolic pressures - if the catheter slips into the right ventricle, the systolic will remain the same but the PA diastolic will fall)
- The RV diastolic will be similar to the right atrial diastolic pressure (compare the suspected RV diastolic with the right atrial (CVP) diastolic.
- The rise in the RV pressure will be closer to the QRS than the rise in the pulmonary artery rise.
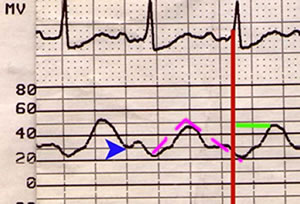
- The pulmonary artery tracing should have a dicrotic notch
- Ventricular arrhythmias may develop if the pulmonary artery catheter is in the right ventricle. The catheter can soften and coil backward so that the tip is sitting in the right ventricle. This can lead to ventricular arrhythmias.
| | |
|
| | Figure 1: Right ventricular tracing from a pulmonary artery catheter | Figure 2: Pulmonary artery tracing from a pulmonary artery catheter |
| | |
| | | Figure 3: PA catheter advanced from right ventricle to pulmonary artery | | | | 2. | Inflate the balloon and observe the monitor for a change to a pulmonary artery waveform. Balloon inflation can facilitate flotation from the right ventricle to the pulmonary artery. A prompt change to a pulmonary "wedge" pattern indicates the catheter was likely in the right ventricle and floated back into the pulmonary artery. If the catheter does not float into the pulmonary artery position, inflation of the balloon "rounds out" the tip of the balloon and decreases the irritation to the ventricular endocardium. | 3. | Attempt to have catheter spontaneously migrate to the pulmonary artery position. - Have patient cough or suction them.
- Reposition the patient
- A sudden intense rise in intrathoracic pressure may force the catheter to migrate with blood flow.
- A change in the patient's position may facilitate movement into the pulmonary artery.
| 4. | - Ensure balloon is deflated.
- Turn any infusions that are being administered via the injectate (blue), VIP (white) or Paceport (orange) lumens "OFF" and administer any critical infusions via the introducer side arm.
- Withdrawal of catheter with inflated balloon could cause injury to the tricuspid valve.
- When the tip is withdrawn to the right atrium, any proximal infusions will back up into the sleeve. The patient may be without important infusions, therefore, critical infusions should be connected to the introducer until the catheter is repositioned.
| 5. | - Carefully withdraw catheter while continuously monitoring the distal waveform.
- Withdraw until a right atrial tracing appears.
- Continue withdrawing for another 5 cm.
- When the right atrial tracing initially appears, the catheter tip will be situated in the right atrium and may be close to the tricuspid valve.
- The tip of the catheter should be withdrawn to maintain a proximal placement to the atrial lumen. This decreases the risk of endocardial injury from the catheter tip.
Note:
If necessary, the distal (yellow) lumen can be used as a CVP line for administration of IV fluids, once catheter tip location in the proximal right atrium has been confirmed by the waveform. | 8. | Notify the physician as soon as possible. | 9. | Document in the clinical record. |
|
Brenda Morgan, CNS: CCTC
Revised: February 4, 2021; Reviewed January 17, 2025 |