This unit is used with either Codman Microsensor EVD (pressure measured using Codman Express) or conventional EVD catheters where pressure is measured using a fluid filled standard transducer.
Review the appropriate procedure based on catheter used:
PROCEDURE FOR SETUP AND USE OF CODMAN EDS 3TM EXTERNAL VENTRICULAR DRAINAGE UNIT
Nurses may prime and connect the intraventricular drainage system in CCTC. All CSF draining catheters (intraventricular; lumbar ICP) must be connected to the Codman EDS 3TM External Drainage System in CCTC for safety. This setup is used for CSF drainage using either the CodmanMicrosensorTM external ventricular drainage catheter or the standard fluid filled pressure monitoring catheters.
Figure 1.01: Overview of EDS 3 EVD Drainage System
The Codman EDS 3TM is a closed system for drainage and pressure monitoring of external ventricular catheters (EVD). An antimicrobial filter located at the top of the graduated collecting chamber and bottom of the drainage collecting bag prevents backward flow of fluid or bacteria. The unit must hang upright at all times. If it is placed flat in a horizontal position, the filter at the top of the drip chamber can become wet, preventing the system from draining properly.
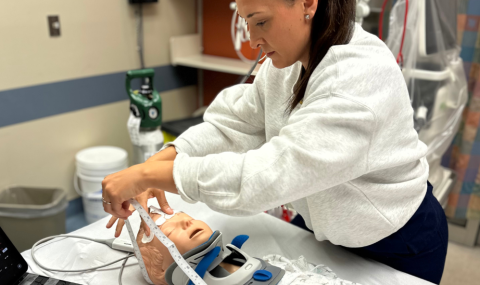
The panel has a "0" reference point that must be positioned at the level of the catheter (in CCTC, the external auditory meatus is used as the reference point). A laser level is inserted to facilitate accurate leveling of this reference point to the patient's tragus.
Figure 1.02: Laser pointer used to level the drainage panel to the patient's tragus.
The drip chamber buretrol is then adjusted up or down until it is at a level equal to the maximum desired intracranial pressure. If the system is open to drainage, CSF will drain as soon as the pressure in the head exceeds the level set by the height of the drip chamber.
Figure 1.03: Graduated drip chamber positioned to drain to either a target ICP in mmHg or cmH20
The Codman EDS 3TM uses 4-way stopcocks. A 4-way stopcock can be open in 3 directions simultaneously. The direction the prong points represents the "off" position.This system may be utilized for continuous pressure monitoring alone, continuous drainage alone or continuous drainage and pressure monitoring. When measuring pressure using a standard fluid filled transducer circuit, the stopcock MUST be temporarily turned "off" to drainage and "open" to the patient catheter and pressure monitoring system. If pressure is measured when the drainage unit is open in all 3 directions, the pressure measured will be a reflection of the both the patient and drainage bag. This is not required when hen measuring pressure using the Codman Microsensor and Codman ExpressTM .
Figure 1.04: The patient end of the EDS 3 system showing clamps and connections
The Codman(TM) drainage system uses a 4-way stopcock (Figure 1.04). The catheter is off in the direction of the "prong" and open in all other directions.
If pressure is being measured using a fluid filled system (standard pressure transducer), the stopcock must be turned off toward the drainage back for 1 minute to obtain an accurate pressure reading (if simultaneously opened to drainage, pressure measurement and the patient catheter, the ICP will be a "merged" pressure.
When using the Codman MicrosensorTM, the stopcock does not need to be adjusted for pressure measurement.
*Note: If you are setting up the drainage system for use with the Codman MicrosensorTM EVD catheter, continue to prime the system with a single hemodynamic pressure set.
If using the Microsensor, do not connect the hemodynamic transducer to pressure monitoring; the Codman Express is the preferred method for monitoring.
If you are using a conventional fluid filled ventricular catheter (not the Microsensor), the transducer on the hemodynamic set will also provide pressure monitoring.
For pressure monitoring see the following procedures based on the method of pressue measuremnt:
The use of an infusion set for priming provides a closed system flush in the event that you need to flush blood or tissue out of the tubing DISTAL to the stopcock (never flush in the direction of the patient catheter). The roller clamp to the flush device is always left OFF.
Pressure tubing provides an additional safeguard against accidental flushing. Even if the roller clamp was inadvertently left on, the flush device of the pressure tubing will only allow flow if the infusion solution is pressurized or the flush device pigtail is activated.
2.
Open Unit
Open package with Codman EDS 3TM, being careful not to drop extension pieces out; extension pieces are loosely connected in package. The connections are loosely attached to facilitate gas sterilization.
3.
Prepare Panel
Perform hand hygiene.
Open up the EDS 3TM Drainage unit and clamp. Ensure all caps are tight to prevent contamination. Hand the unit upright on an IV pole in preparation for priming.
Replace the vented white cap located on the mounting panel stopcock (at the "0" reference mark). Change vented caps to dead-end luer lock cap (provided in kit).
Turn the mounting panel stopcock off toward the cap (open to the patient catheter and drainage chamber).
Always leave the mounting panel stopcock in this position; if you wish to turn the stopcock open or closed to drainage, use the stopcock closest to the patients head. By only adjusting one stopcock during use, the risk of accidental closure/opening of the system is reduced.
This opens the system between the drainage tubing and drip chamber in preparation for flushing.
4.
Prime the Unit
Hang a bag of normal saline. DO NOT ADD HEPARIN OR PRESSURIZE THE PRIMING SOLUTION.
Prime the pressure tubing (Figure 1.05).
Figure 1.05: Prime with plain normal saline
Remove the extension piece at the distal end of the pressure tubing and connect the pressure tubing to the stopcock on the drainage tubing that is closest to the patient (Figure 1.06). This will be called the "patient stopcock". This will be used to prime the EDS 3TM.
Figure 1.06: Patient stopcock
Connect the distal end of the pressure tubing using aseptic technique (after removing the extension tubing) (Figure 1.07).
Figure 1.07: Connecting Pressure Tubing to Patient Stopcock
Turn the patient stopcock off to the patient connection. This will open the drainage unit to prime between the patient stopcock and drainage collecting unit.
Pull the flush device until the all air bubbles have been eliminated and fluid drips readily into the drip chamber.
Turn the patient stopcock off towards the drip chamber.
Flush the circuit until all air has been expelled between the patient stopcock and end of drainage tubing.
Ensure caps are intact on end of drainage tubing to prevent contamination
Turn the patient stopcock to a 45 degree angle from the tip. This will prevent the loss of the priming solution or entry of air.
NURSES ARE NOT APPROVED TO FLUSH BETWEEN THE PATIENT STOPCOCK AND THE PATIENT CATHETER. This is done by neurosurgery when required. The location of the drain in the ventricle should be confirmed before flushing.
The entire circuit must be primed to facilitate drainage. Be careful to maintain aseptic technique; CSF contains glucose which promotes bacterial growth that can cause meningitis.
The usual method for meausring pressure in CCTC is to insert an EVD with a Codman Microsensor and Codman ExpressTM. This measures pressure independent of the fluid pathway.
Once primed, the pressure tubing could be used to measure intracranial pressure if a fluid filled catheter is used. The pressure tubing is connected to the stopcock closest to the patient to minimize the length of tubing that the pressure wave must travel if fluid filled pressure monitoring is being done. It also provides a closed system to flush blood and debris from the drainage tube (distal to the stopcock). Flushing between the patient stopcock and the drainage unit should be performed intermittently to prevent clotting.
Turn the laser on and position the beam on the patient's tragus.
Adjust the clamp until the laser beam is level with the tragus (this will need to be readjusted once the catheter is inserted or anytime the HOB is adjusted).
Figure 1.08: EVD zeroed to the level of the tragus.
6.
Set the Drainage Level
Obtain an order for the level of the drainage chamber.
Loosen the buretrol adjustment screw and move the drip chamber until the small arrow is aligned with the desired height (Figure 1.09).
Tighten the screw to secure the buretrol position.
Figure 1.09: Adjust to the Ordered Level of Drainage
NOTE:
A typical order is "10 cmH20" above the head. The right hand column of numbers (green column) is in cmH20. The column to the left is in mmHg provides the corresponding pressure in mmHg. (Figure 1.09).
In the example of "10 cmH20", the system is correctly placed if the "0" reference point is level with the patient's external auditory meastus or tragus and the small arrow is aligned at the 10 cmH20 marking.
INTERPRETING DRAINAGE AND PRESSURE
If the "0" reference is level with the patient's catheter, a drainage level of 10 cmH20 above the head provides automatic "venting" of fluid from the head the moment the intracranial pressure rises above 10 cmH20. If the "0" reference and the drip chamber are both positioned level with the catheter, drainage would occur the moment the pressure in the head > 0. Normal ICP is < 10 mmHg. If the drainage is set at a level below normal ICP, drainage will occur even if the ICP is not elevated.
Weaning of the drainage system can be done by raising the level of the drainage unit. Drainage will only occur if the pressure exceeds this higher pressure. Intermittent drainage may also be initiated, where pressure is monitored and drainage only opened if the pressure exceeds a specific level.
Both the patient and panel stopcocks must be open between the patient's catheter and the drainage chamber for drainage to occur. When the system is left continuously open to drain and the drainage chamber is positioned to initiate drainage at a set level, ICP can be maintained at a more consistent level.
Note that the bedside monitor measures pressure in mmHg; 10 cmH20 is the same as 7.4 mmHg. Thus, a properly positioned unit with the drip chamber at 10 cmH20 will drain if:
the stopcocks are open between the patient's catheter and the drip chamber
the pressure in the head exceeds 10 cmH20 (or exceeds 7.4 mmHg on the bedside monitor).
the catheter/circuit is patent (e.g. free of clot or debris)
there is fluid in the ventricle available to drain (if the pressure is high due to brain swelling but the ventricles are collapsed, there won't be any CSF available to drain)
If the circuit fails to drain despite a pressure on the monitor that is > than the level of the drainage chamber, patency can be assessed by lowering the entire drainage unit to below the head.
Notify Neurosurgery if the unit fails to drain in the presence of an elevated pressure despite troubleshooting efforts.
7.
Connect to Patient
Following insertion of the intraventricular catheter, the physician must insert the small white connector into the silicone intraventricular catheter
The connector has a "nipple" end that is inserted inside the catheter tip. This nipple has a luer lock connection for attachment to the EDS 3TM frainage tubing.
Connectors are provided in both the intraventricular catheter kit and the CodmanTM.
8.
Documentation
In IView, select the Adult ICU Lines - Devices Navigation Band. If you do not have Intracranial/Lumbar Monitor and Drain as an option, select it from custom view. Select the Intracranial/Lumbar drain type and create a Dynamic Group. Record Pressures and Hourly Output.
Create a Dynamic Group for documentation of ICP or CSF drainage.
Developed by: Brenda Morgan CNS, CCTC Initial Procedure: November 1988
Last Update: February 1, 2020 Reviewed: February 4, 2021; Revised January 17, 2025