Ensure that patient and health care provider safety standards are met during this procedure including: - Risk assessment and appropriate PPE
- 4 Moments of Hand Hygiene
- Procedural Safety Pause is performed
- Two patient identification
- Safe patient handling practices
- Biomedical waste disposal policies
|
- Rule out Contraindications
- Establish enteral feeding
- Assemble Personnel
- Perform Safety Pause
- Obtain pillows and positioning supplies
- Prepare Patient
- Place pillows
- Position Limbs
|
SAFETY: Ensure Senior Resident or Consultant is in CCTC before elective proning or supination. The goal is to plan turns for periods when adequate manpower and airway expertise is available. If a patient needs urgent proning or supination a Senior Resident or Consultant should be present. If required urgently before Senior Resident can arrive, page Anaesthesia for urgent backup in advance of turning. Significant lip, face and airway edema can develop when the patient is prone. Patients are deeply sedated and usually paralyzed with neuromuscular blocking agents (NMBs). ETT position should be assessed AT THE TEETH, before, during and after proning. If the patient develops a cuff leak following pronation, recheck the ETT position AT THE TEETH to ensure the tube has not moved. If air needs to be added more than once, an Xray in the prone position to include the upper airway should be performed to rule out laryngeal placement. |
| PROCEDURE |
1. | Rule out Contraindications Identify indications and goals for proning with physician and review any contraindications or relative contraindications including (review with consulting services if appropriate):: - Raised intracranial pressure (review with neurosurgery before proning)
- Massive hemoptysis (requiring intervention)
- Tracheostomy or tracheal surgery
- Severe facial trauma
- Eye trauma or injury
- Unstable C spine
- New pacemaker insertion (within 2 days)
- Anterior chest tube with air leak
- ECMO
- Open abdomen/recent abdominal surgery
See modifications for proning during pregnancy Notes: Decisions to prone should be made on a case-by-case basis. Nurses should be aware of situations where proning may be contraindicated and ensure these issues are taken into consideration. Other services involved in the care of the patient (e.g., neurosurgery, CVT or thoracic surgery) should be included in decision-making when potential contraindications exist. If a decision is made to prone in the setting of a potential contraindication, clinical documentation by the physician is required. |
2. | Establish Enteral Feeding is Possible Prior to proning, insert a small bowel feeding tube unless enteral feeding is contraindicated or proning is required urgently. Refer to Procedure for the Insertion of a Small Bowel Feeding Tube. If enteral feeding is contraindicated review need for TPN with physician/dietitian. If proning is required urgently, initiate feeding when repositioned supine. Maintain reverse Trendelenburg while in the prone position if possible. If reverse Trendelenburg cannot be maintained, insert a gastric drainage tube. Notes: Gastric drainage may be impaired in the prone position, particularly if reverse Trendelenburg cannot be maintained. Gastric secretions are produced on an ongoing basis. If a patient is prone and flat (or head down), there is increased risk for aspiration. Nutrition is important to a critically ill patient's recovery. Small bowel feeding may promote better feeding tolerance. |
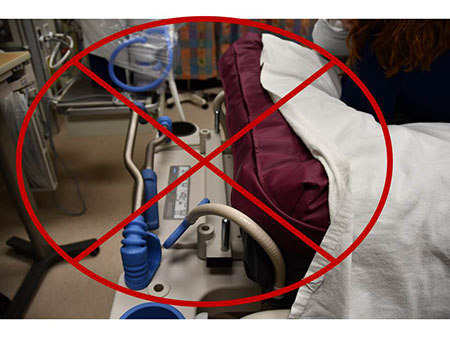
3. | Select Bed and Assemble Personnel Remove the headboard from the bed and ensure that a bedside table can fit at the top of the bed. Our new Progressa beds cannot accommodate a bedside table.
| | Figure 1: Do not use this type of bed as a bedside table will not fit. |
A minimum of 5 staff members (or more) are required to prone a ventilated. - "Airway Manager" at head of bed
- 2 staff members on each side of the bed
Additional staff members may be required if the patient is very large or has complex lines and tubes. An RRT or physician must be present and assumes responsibility for the airway. During turning, the person responsible for the airway provides the team direction regarding when to turn ("on my count we turn after 3"). RN to assess vascular devices and lines and advise turning team around line safety. TURN PATIENT WITH C SPINE PRECAUTIONS TO PROTECT SPINE AND JOINTS. Ensure there is an RRT and physician available in the unit who is skilled at intubation prior to turning. Notes: Patients with severe ARDS are deeply sedated and often paralyzed during proning. Paralysis increases the risk for join, limb and nerve injury due to altered neuromuscular stability. Patients who are on neuromuscular blockers should be treated like a spinal cord injured patient and need sufficient personal to maintain proper spine and limb alignment. DO NOT allow neck to be extended backward during repositioning as this can cause spine injury or loss of airway. Attempting to turn with insufficient numbers of staff increases the risk for patient and staff member harm. Loss of airway in a patient with severe ARDS is life-threatening. A physician or RRT who is able to reintubate if necessary must be available. |
4. | Perform Safety Pause
With team assembled, review the procedural steps to ensure everyone knows the plan. Review online Procedural Safety Pause Review emergency response and ensure appropriate personnel and equipment is available prior to turning including: - Accidental extubation (reintubation equipment available, bag-mask)
- Rapid supination plan in the event of cardiac arrest
- Accidental loss of other lines and tubes (e.g., central venous, arterial or dialysis lines, chest tubes)
|
5. | Obtain Supplies We no longer use gel pads. Obtain sufficient supply of pillows (4-6) and nerve protectors. Obtain an overhead table and foam head support (don't open it unless you decide to use it for positioning). can be placed at head of bed and positioned slightly below the mattress (similar to a massage table). The patient can be moved so that the shoulders are at the edge of the bed with the head extended beyond the head of the bed. Arms can be brought forward in a relaxed position with chest elevated on a pillow and mattress higher than table. Pillows placed on the table can be used to support the head in a side to side for side to side positioning. Once positioned, THE TABLE MUST BE SECURED TO THE BED FRAME TO PREVENT MOVEMENT. Pillows can be used to help raise the chest and pelvis off the bed. This reduces pressure points and abdominal pressures. Reduction in abdominal pressures may improve ventilation. |
6. | Prepare Patient 1. Turn patient to one side and apply ECG leads to the patient's back. When finished, remove all chest electrodes 2. Examine patient's chest to identify areas vulnerable to pressure (e.g., subclavian or jugular lines). Integrate strategies to alleviate pressure on these point. 3. Reposition all lines and tubes that are located above the patient's waist straight upward toward the head of the bed. 4. Reposition all lines and tubes that are located below the waist (e.g., bladder catheter, femoral lines, fecal drainage systems and chest tubes) straight down toward the foot of the bed. 5. RRT to evaluate ETT securement and identify ETT distance marking AT THE TEETH prior to turning. Notes: ECG electrodes, chest tubes and central venous catheters can lead to significant skin breakdown if the patient lies on them. Placing all lines and tubes in an upward and downward line from the patient facilitates turning. This maneuver prevents the lines from getting tangled or from getting caught underneath the patient (where they cause skin breakdown). With lines and tubes directed upward and downward, the patient can be freely turned in a way that is similar to the principles of a rotisserie. |
7. | Place Pillows With patient in supine position, place one or two pillows across the upper chest. This will ensure the chest and shoulders are elevated off the bed. Chest elevation is critical to airway maintenance. Place another pillow horizontally across the iliac crest and a third across the upper thighs. Place a thinner pillow over the shins. If the patient has a femoral line, position pillows around the device to ensure the femoral line is protected from pressure. |
8. | Position Limbs for Turning Turn patient prone and supine with their face looking in the direction of the ventilator. Arms: - Position arms along the side of the body with fingers pointing toward toes
- Keep arms as close to body as possible
Feet: - While patient is supine, cross feet at the ankles by placing the foot OPPOSITE to the ventilator on top.
|
9. | Cover Patient with Linen
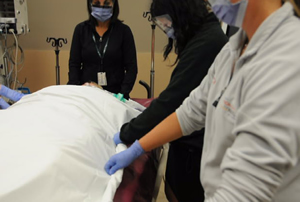
Place two lift sheets over the patient's chest and midsection. Cover the lifter and entire patient with a sheet. The sheet should cover from the head to foot of the bed. Fold the section of the sheet that is above the shoulders so that the patient's head is not covered up. Figure 3: Apply Lifters Notes: The top linen will become the new bottom linen following proning. This linen will facilitate turning and make the bed in the same step. The head must be uncovered to observe the airway. When fully open, the sheet needs to extend to the head and foot of the bed to serve as a bottom sheet. |
10. | Sandwich Patient Between Sheets Grab both the top and bottom sheets together. Along both sides of patient, tightly roll the sheets together like a TIGHT jelly roll to sandwich patient firmly between the sheets. Note in the Figure 4 below the patient's head is exposed.
Figure 4: Rolling Top and Bottom Sheets to Sandwich Patient Notes: Sandwiching the patient between the sheets helps maintain alignment and protect limbs during turning. The "jelly roll" approach helps facilitate turning while keeping patient secure. |
11. | Slide Patient Away from Ventilator
Slide the patient to the side of the bed away from the ventilator.
The patient will be turned to face the ventilator. This provides the most "slack" for the ventilator tubing. Moving the patient away from the ventilator ensures sufficient bed surface for pronation. |
12. | Conduct First Turn The "Airway Manager" is responsible for determining when to turn. Prior to turning, review the expectations for when to turn (for example, "we will turn when I say 3 in a 1, 2, 3 count"). Review the plan for the turn as follows: - Log roll using spinal precautions
- Hold tightly onto jelly roll at each side to secure patient
- Turn patient onto side only
- Following turn, airway manager to adjust ETT and tubing in preparation for final turn
Notes: By taking a moment to review lines and tubes between turns, adverse events are prevented. Take your time when turning, there is no rush between perpendicular and prone. |
13. | Complete the Pronation The "Airway Manager" is responsible for determining when to turn. Prior to turning, review the expectations for this second turn. Airway and line placement takes priority and determines pronation speed. The pronation step poses the greatest risk for the ETT. Review the plan for the turn as follows: - Slowly turn the patient prone
- Hold tightly onto jelly roll at each side to secure patient
- "Airway Manager" to provide feedback on speed of turn according to airway needs
- Support ETT
- Maintain neck alignment
|
14. | Assess Airway Following proning, RRT to reassess: - ETT distance AT THE TEETH
- Cuff leak
- Pressure points around ETT and securement device
- Check for any kinks in tubing
- Breath sounds, ventilator parameters
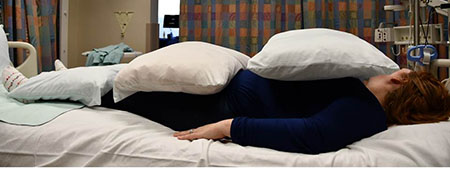
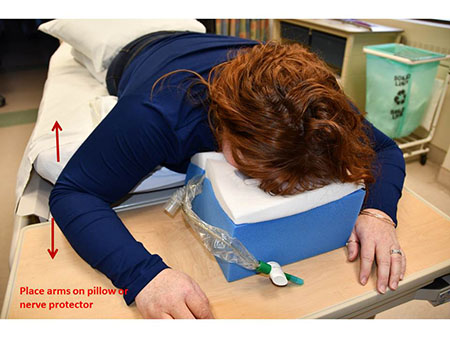
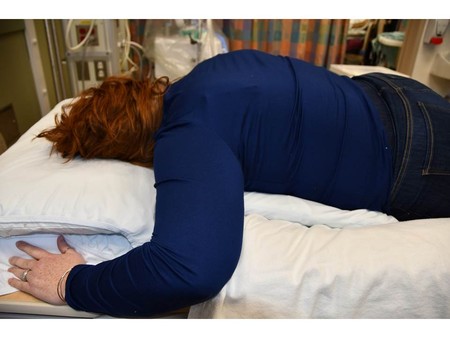
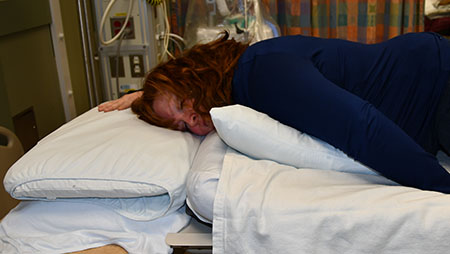
Lifting team to assist RRT to establish airway patency. Placing the shoulders and chest above the patient's head helps to keep the airway patent. Moving the patient to the top of the bed with shoulders at the edge of the mattress and head extending beyond the mattress can be very effective. Position the bedside table lower than the mattress while the patient's head is supported. place two pillows on the bedside table and adjust the level so that the patients head is relaxed. The shoulders and elbows can be gently flexed in this position and brought upward on each side of the patient's head. Once the bed/table position is optimized, SECURE THE TABLE TO THE BED TO PREVENT MOVEMENT. All patients should have their head repositioned Q2H. This can usually be managed by turning from one side to the other. If the patient has an IJ line, avoid positions where patient is lying on the catheter. In these cases, you can alternate side turning (with catheter side up) with face down. Face down can be achieved by obtaining a foam head support. The foam head support is placed on the bedside table instead of pillows, and the table:mattress position adjusted to optimize alignment.
| | Figure 5: Face down using foam pad. |
PRECAUTIONS: The need to add air to the ETT cough more than once could indicate that the ETT has migrated into the pharynx or damage to the pilot/cuff. Perform an PA chest Xray to assess tube placement. Note: Edema will settle in dependent areas and can lead to asymmetrical facial swelling, swelling of the eyes and eyelids and periorbital region, as well as all dependent areas of the body. When using Anchor Fast(TM), check ETT securement frequently and monitor pressure points closely, especially along the plastic ETT holder. Alternate methods of securement may be required.
| |
Figures 6 and 7: Head positioned on bedside table and turned side-to-side |
|
15. | Optimize Position Adjust the patient to minimize risk for both pressure injuries and nerve entrapment. Patients with severe ARDS are deeply sedated and often paralyzed during proning. Paralysis increases the risk for join, limb and nerve injury due to altered neuromuscular stability. Patients who are on neuromuscular blockers should be treated like a spinal cord injured patient and need sufficient personal to maintain proper spine and limb alignment. Attempting to turn with insufficient numbers of staff increases the risk for patient and staff member harm. Loss of airway in a patient with severe ARDS is life-threatening. A physician or RRT who is able to reintubate if necessary must be available. Optimal prone placement will include: - Q 2 H head repositioning
- Ongoing assessment and pressure relief of vascular devices and tubes
- Patient not lying on tubing or devices
- No ECG electrodes on chest
- No EEG leads on dependent side of head
- Eyes moist and lids closed at all times
- Pressure relief for knees. The donut shaped gel pads can be placed under each knee cap
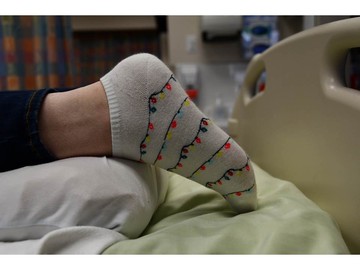
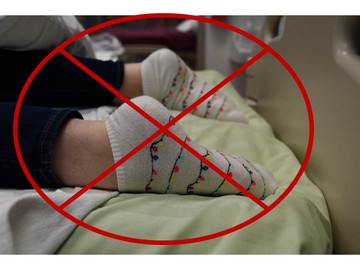
- Feet should be maintained in dorsiflexion (ankle at 90 degrees, no downward toe pointing)
- Dorsiflexion can be maintained by placing a gel roll under the lower shin to raise ankles off bed
- For large breasted women, position breast laterally to reduce pressure on nipples/breast tissues
- Male genitalia should hang freely; iliac roll helps to raise pelvis (Note: patient is deeply sedated and usually on NMB)
- Foley positioned between patient's legs
- Shoulder should be relaxed and "dropped" below chest"; avoid "shrugging" positions as this can lead to frozen shoulder/brachial plexus injury.
- Alternate arm positions. Dropping the arm below the bed surface (e.g. on padded bedside table) can help relax the shoulder; this can usually be done one arm at a time)
- A swimmer's crawl position (one arm above head and opposite arm at side) can be tried
- Protect against ulnar nerve injury with nerve protectors or gel pads; reposition frequently
- Reverse Trendelenburg
Should be able to slide a hand under patient's abdomen (may be difficult if very obese) Notes: During pronation, pressure points must be altered with head turning, tilting, limb adjustments etc. every two hours. Although not studied in clinical trials, patients who are on rotational bed might benefit from a very gently 10 degree rotation as a strategy for pressure relief. If a rotational bed is available this strategy may be explored and assessed on an individual patient basis. |
Figures 8 and 8: Correct and incorrect foot placement |
|
|
16. | Document Inspect skin carefully and provide padding to protect invasive devices. Document patient position in the Adult ICU Quick View Band. Document date and time of proning onset and return to supine. Document skin condition, each pressure relief measure and skin condition condition in the Integumentary System. If pressure injuries or wounds develop, document in the Incision, Skin Abnormality and Wound section. |