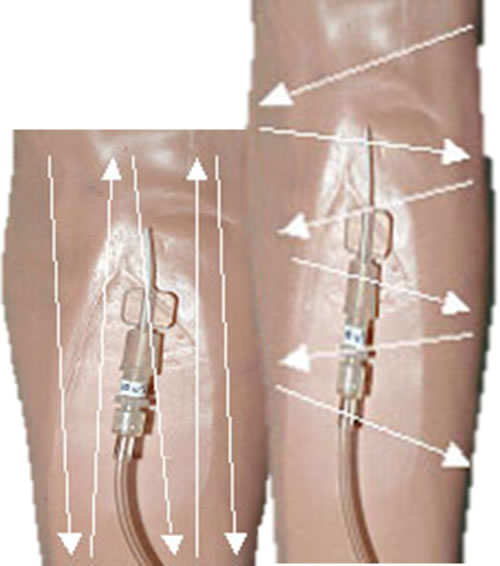
Procedure | | 1. | Dressing Type - The preferred dressing for arterial and central venous lines is a transparent dressing with CHG pad
- Unsutured lines require the use of a securement device; this is changed with each dressing change (e.g. PICC)
- Lines that are actively oozing or where occlusivity cannot be maintained using a transparent dressing should be dressed with a gauze dressing and tape
- All PICC lines are unsutured
- Avoid the use of bulky dressings on any vascular access device (including post removal).
- Do not wrap dressing material or tape circumferentially around an arterial line site.
Allergies: Check for allergies prior to doing dressing and obtain plain transparent dressing or gauze if patient has a CHG allergy. The most common cause for contact dermatitis is inadequate dry time for CHG prep. If you suspect an allergy to CHG, apply a small test area on the inner arm to confirm/refute allergy. Notes: There is evidence that transparent dressings containing a CHG gel pad may reduce central line infection. Transparent dressings allow daily visualization of the site to identify signs of potential infection. They also protect the site from pathogens while allowing some of the moisture to be drawn away through the "breathable" membrane. Bulky or pressure dressings will not stop bleeding from a vascular device but will delay the detection of serious bleeding. Gauze dressings do not allow site visualization. Circumferential dressings around a wrist can compromise circulation of the hand. | | 2. | Dressing Change Frequency Transparent Dressings - Change all TRANSPARENT arterial and central venous line dressings Q 7 days (transparent) and PRN to maintain occlusivity
- Change dressings if CHG pad feels "boggy" to touch or is significantly swollen (pad does not need to be changed if it contains blood unless the volume of fluid in the gel pad is large or lifting the dressing)
Gauze Dressings - Change all GAUZE arterial and central venous dressings DAILY and PRN
- If using tape and gauze on central/arterial lines dressing should be changed daily.
- Change any dressing that has loosened or lost its occlusive properties.
Notes: Daily site inspection is a standard supported by CDC and Canadian Patient Safety Institute. If transparent dressings are not being used (which allow for site visualization), dressings should be changed daily to allow site inspection and/or to remove moist dressings. Due to poor skin integrity, diaphoresis etc, dressing changes are done q48hr and prn to remove skin colonization. If the patient is stable with good skin condition, transparent dressings may be left in place for 7 days (per hospital policy). There is no evidence that routine line change dates decrease infection rates; insertion of a new line may pose a risk for introducing infection, especially changes at the arterial line insertion site. Lines are changed when evidence of redness or infection is present. The risk for central line infection due to arterial line source increases when arterial lines are in place longer than 5 days or are positional. | | 3. | Confirmation of Vascular access: - All newly inserted arterial or central venous catheters (including IJ, SC or femoral) must be connected to pressure monitoring before initiation of any infusions with a copy of the waveform posted to the chart. An initial baseline ScvO2 blood gas is also required.
- Once a venous waveform has been confirmed (i.e. arterial placement ruled-out), the line can be used (including vasopressors and MTP). Following waveform confirmation it can be used while chest xray is pending.
- Chest Xray is required following insertion and upon admission of a patient with an established upper limb central venous lines (including admission from the OR).
Safety:
Venous waveform confirmation must be obtained before initiation of central line infusions; confirmation of venous placement is required for all IJ, SC and Femoral venous lines to rule out arterial placement. Ultrasound and Xray alone cannot rule out arterial placement. Infusion pumps will continue to run without alarming if a catheter is intra-arterial instead of intravenous. Inadvertent intraarterial infusion of vasoactive drugs can be limb or life-threatening. If an intended central venous catheter has inadvertently been placed into an artery, the waveform will only be visible if the diastolic blood pressure reading is lower than the top of the scale. If you cannot identify a waveform in a newly inserted central venous line (the default CVP scale is 30), increase the scale to 200 to see if an arterial waveform is present. A right ventricular waveform may be visible following IJ or SC insertion. This occurs most frequently when a 20 cm catheter is used for right sided placement of the patient is of short stature. If the tip is in contact with the ventricle wall, ventricular arrhythmias or injury may occur. The catheter should be partially withdrawn. Air entry and the risk for air embolism is a serious complication of central venous catheters that must be prevented during insertion, maintenance and removal. See procedure for removal of a central venous line. All intravascular catheters should display a waveform appropriate to the tip location. If a waveform that is appropriate for the insertion site is not visible (despite troubleshooting and expanding the scale size), the line should not be used until the catheter location can be confirmed. Central venous catheter malposition, thrombosis or kinking may be identified by catheter or individual lumen dysfunction. Each lumen should flush easily and allow blood aspiration, and if connected to pressure monitoring should display a central venous waveform. Catheters can migrate extravascularly into the interstitium, pleural space, trachea, epidural space, thoracic duct, solid organs or within a hematoma. Abnormal placement may only be evident in one of the lumens (usually the distal tip), but rarely, the proximal lumens can be malpositioned with the tip intravascular (usually a catheter that has slipped back). Venous waveform confirmation does not rule-out all types of catheter malposition. Congenital anatomical variations in the venous circulation can cause catheters to travel in an unusual trajectory (e.g. left sided superior vena cava, partial anomolous pulmonary veins). Venous catheters can be inadvertently advanced into unintended veins (e.g. from IJ into sublcavian). If the catheter migrates into a small vein (e.g. azygous), it may be difficult to aspirate blood and flow rates may be impaired. The catheter should be carefully repositioned to avoid complications including: catheter trapping, endothelial damage, thrombosis or occlusion of venous drainage with leakage of fluid, pleural effusion or perforation. While malpositioning occurs most frequently at the time of insertion, catheters can migrate forward or backward leaving the tip in the wrong location. Delayed complications can occur if a catheter tip perforates a vessel wall, or if the catheter is inadvertently advanced or withdrawn, including vessel injury or extravascular infusion. If blood flow and/or infusion flow from the proximal lumens is impaired, or the patient experiences symptoms of chest pain, limb swelling or any concerns that could be attributed to the catheter or insertion site, the line should not be used until troubleshooting and further investigation is completed. If a central venous catheter cannot be identified on Chest Xray, rule out intracranial placement which will not be identified by pressure waveform. Vertebral artery placement is a rare complication of intended IJ insertion. IJ or SC catheters can migrate upward into the jugular vein toward the jugular venous bulb. Most individuals have a valve located at the | | 4. | Routine Assessment and Monitoring At the start of each shift and Q4H - Assess waveform to confirm venous placement and catheter patency. Post to the clinical record.
- Inspect insertion site and surrounding area for swelling, tenderness, crepitus, redness or discharge.
- Confirm accuracy of all infusions and rates and identify site of administration.
- Inspect dressing integrity and palpate gel pad to assess for bogginess. Change dressing when indicated.
- Determine the amount of exposed catheter at the skin surface if the catheter is not fully advanced and document.
- Assess distal extremity for color, circulation, motion and swelling.
- Whenever possible, keep dressings exposed or minimize the amount of linen (e.g., a light sheet) for prompt detection of bleeding.
- Keep arterial line alarms on to promptly detect dislodgement of catheter or hemodynamic instability.
- Troubleshoot dampened waveforms (e.g. assess flush bag/pressure, pressure tubing, catheter kinking).
- Determine any line issues (e.g. positional) and/or insertion bundle compliance concerns. Report to team and document plans for resolution.
- Review the ongoing need for arterial and central venous lines during team rounds each day.
- Lines inserted during an emergency procedure where prep time may have been shortened or other breaks in aseptic technique may have occurred should be changed as soon as possible after initial resuscitation (including those inserted in the OR).
Notes: All insertion sites must be assessed on an ongoing basis for signs of infection, bleeding, hematoma, thrombosis, interstitial placement or, catheter migration. Crepitus or air in the IV tubing could indicate a cracked catheter or hub, or loose luer-lock connection. Crepitus can also indicate infection or air. Swelling or impaired circulation distal to an arterial line could indicate limb ischemia due to arterial occlusion from the catheter, from a thrombus or a hematoma. Swelling or impaired circulation distal to a central venous catheter could indicate thrombosis or hematoma (hematoma could also compromise surrounding arterial flow). Hemorrhage can be extensive and rapid from a disconnected or dislodged arterial or central venous catheter. Significant blood loss can occur under a thick dressing or layer of blankets. Central venous and arterial lines are indicated if ongoing resuscitation, vasoactive agent infusion or frequent ventilator changes are required. When a patient no longer requires central venous access, CVP monitoring, frequent blood gases or close blood pressure monitoring, consider changing a central venous line to a PICC or conversion to peripheral IVs. Positional arterial lines, colonization/contamination of peripheral or arterial catheters, inadequate line anchoring with catheter movement, inadequate flushing and thrombosis are all important risk factors for central venous blood stream infections. | Insertion and Q Shift Vascular Device Assessment and Documentation To identify lines at risk for central line infection, accurate document of a patient with established lines is essential. Documentation should identify where the line was inserted (e.g., in CCTC or another unit/facility), if there is documentation of compliance with the central line insertion bundle or if there were observed breaks in aseptic technique. If there is no documentation to confirm that aseptic technique was maintained or there were observed breaks in aseptic technique, the line should be flagged as having "issues for review". This needs to be reported in the following morning rounds and the plans for the line documented. Confirmation of line placement by blood gas and pressure monitoring upon insertion/admission is documented in the graphic record (ScvO2), by printout of the waveform and in a DAR note by the RN. The RN is also also records the name of the physician who reviewed the Chest Xray to confirm completion. The individual who performed the insertion is required to document confirmation of central venous line placement as well as the results of the Chest Xray (for upper limb central venous lines) at the bottom of the Central Venous and Arterial Line Checklist and Procedure Record. Communicating and Closing the Loop The critical care nurse is expected to identify lines that may need replacement and report issues during morning rounds (or earlier if urgent replacement is required). The plan for this line should be documented in the AI record under "Plan of Care". If the plan is not completed on the current shift, it is important to communicate this information to the oncoming shift and to document in the AI record the plan status. If the line change is deferred to the following day, the issue should be presented during morning rounds. If decisions are made to leave a line in place, there should be physician documentation in the progress note to support the decision. . Refer to the Nursing Documentation Standards for line tracking information. | | 5. | Dressing Change Procedure Non-sterile gown, cap and mask with eye shield is required by anyone within one meter of field. The dressing should be performed using aseptic technique. This includes preparing the tray using the transfer forceps to add sterile supplies. A sterile field should be created using drapes provided in the tray. Sterile gloves are worn following removal of the dressing and must be worn during any touching of the catheter site. Caution should be taken to prevent glove contamination. Prior to starting, perform a bedside assessment to determine if the patient requires sedation or if an extra pair of hands will be needed to maintain patient positioning and prevent contamination of the sterile field. The patient should be positioned so that the full area under the dressing is visible and the patient can remain still during the prep time. When changing an IJ dressing, the ETT or trach ties should be removed on the side of the dressing. If it is not safe to undo the AnchorFast on that side without assistance, request RRT assistance. The entire field needs to be fully exposed to facilitate successful dressing application. Once the dressing has been applied, the AnchorFast tie can be reconnected and gently positioned on top of the dressing with the lumen over the top of the ties. This enhances adhesion (improves with heat and friction) and takes some of the weight from the catheter lumens off the top of the dressing. If adhesive tape is being used, the tape should not be place over-top of a CVC and care must be taken to ensure it does not slide under the dressing or disrupt it. Hair should be clipped during the dressing change to enhance adhesion, Shaving is contraindicated. | | 6. | Prepare Tray - Perform hand hygiene
- Open tray at bedside
- Don cap, gown, face mask with eye shield
- Open sterile tray. Maintain aseptic technique and use the overwrap to create a sterile field.
- Open sterile supplies and add to the tray using transfer forceps (don't open and drop them onto the field):
- Dressing
- Securement device
- CHG swab (2 are included with Central Venous and Arterial Line Dressing Tray)
- If patient has a lot of drainage, add sterile normal saline for a sterile field
- Open the top of the no-sting barrier film and loosen the package. Expose approximately 2 inches of stick, leaving moist swab stick in the package. Lean the no-sting barrier film toward the edge of your sterile field where you can later remove it without contaminating your field (the swab will dry out if you place it on your tray in advance).
| | 7. | Remove Old Dressing - Don non-sterile gloves (included in dressing change tray)
- Secure the dressing with one hand while gently removing existing dressing starting with the securement device
- If line a sutureless securement device is being used, remove the dressing over the securement device first.
- Remove the securement device using a shoveling movement with the CHG swab.
- Once removed, tape the ends of the catheter lumen to the patient maintaining catheter alignment, with tape placed well beyond the area where the new dressing will be located.
- Remove remaining dressing
- If hair removal is required, clip using the sterile clipper head prior to skin cleansing.
- Remove gloves and perform hand hygiene
| | 8. | Cleanse site: - Don sterile gloves
- If site is visibly soiled, cleanse area with saline soaked gauze using metal forcep
- Dry saline (if use) with a gauze square before prepping with CHG
- Scrub the entire area using 2 - CHG 2% and alcohol 70% swabsticks:
Swab 1: Use an up and down motion while moving from left to right. Turn the swabstick over and scrub the same area using a side to side movement. Swab 2: Lift the catheter and cleanse the skin underneath using an up and down motion. With the unused side of swab to cleanse the undersurface of the tubing.
- Ensure a minimum of 2 minutes
- Apply no-sting barrier film to area that will be covered by dressing (excluding the area under the CHG)
- Allow the full 1 minute dry time
Notes: The friction produces during scrubbing loosens epithelial cells and improves skin exposure to antiseptic solution. All surfaces of skin and catheter should be cleaned. The most common cause of skin burns and redness is the application of the dressing before the prep has adequately dried. Longer than 2 minutes may be required if more than 2 swabs have been used or the skin is visibly wet. No-sting barrier film enhances dressing adherence and protects the skin. Application of no-sting under the CHG pad can cause skin burns. | | | 9. | Apply Dressing: - Apply securement device
- Press and smooth edges of device completely
- Position the dressing so that the CHG pad is over the insertion site and the dressing extends to cover the securement device and/or catheter hub.
- Gently press the dressing and press toward the edges. DO NOT STRETCH during application.
- Remove the dressing border.
- Remove the anchor strip (still attached to the border) and position it over the bottom of the dressing so that it is half on the skin and half on the actual dressing.
- The smooth side of the border paper can be rubbed over the dressing toward the edges enhance adherence.
- Date the dressing and update the Kardex.
Notes: Stretching during application can lead to skin burns. Smoothing the paper over the dressing after dressing application produces heat and friction which improves dressing adherence Successful dressing application takes time, but results in prolonged adherence with less frequent changes and site exposure over time. | | 10. | Document Document dressing changes and assessment findings Q shift and PRN in the EHR. Update “date due for next change” in the Actions and Situational Awareness section in Nurse View of the EHR. Document the plan for abnormal findings. |
References Canadian Patient Safety Institute: (2012). Prevent Central Line Infections. Getting Started Kit. Bashar Alzghoul, Ayoub Innabi, Aditya Chada, Ahmad R. Tarawneh, Krishna Kakkera, Khaled Khasawneh, "Central Venous Line Insertion Revealing Partial Anomalous Pulmonary Venous Return: Diagnosis and Management", Case Reports in Critical Care, vol. 2017, Article ID 3218063, 6 pages, 2017. https://doi.org/10.1155/2017/3218063 Bowdle A. Vascular complications of central venous catheter placement: evidence-based methods for prevention and treatment. J Cardiothorac Vasc Anesth. 2014 Apr;28(2):358-68. doi: 10.1053/j.jvca.2013.02.027. Epub 2013 Sep 2. PMID: 24008166. Cho, Ho Bum MDa; Kim, Sang Hyun MDa; Yoo, Jae Hwa MDa; Gong, Hyung Youn MDb; Seo, Yong Han MDb; Park, Sun Young MDa; Chung, Ji Won MDa; Kim, Mun Gyu MDa; Chung, Jin Hun MDb; Kim, Sang Ho MD, PhDa,* Malfunction of a central venous multilumen access catheter caused by kinking, Medicine: July 2018 - Volume 97 - Issue 30 - p e11622 doi: 10.1097/MD.0000000000011622 David L. Dornbos, Shahid M. Nimjee, Tony P. Smith. Inadvertent Arterial Placement of Central Venous Catheters: Systematic Review and Guidelines for Treatment,
Journal of Vascular and Interventional Radiology, Volume 30, Issue 11, 2019, Pages 1785-1794, ISSN 1051-0443, https://doi.org/10.1016/j.jvir.2019.05.017. Hibbard, J., Mulberry, G., Brady, A. (2002). A clinical study comparing the skin antisepsis and safety of ChloralPrep, 70% Isopropyl Alcohol, and 2% Aqueous Chlorhexidine. Journal of Infusion Nursing. 25(4), 244-249. Hodzic, S., Golic, D., Smajic, J., Sijercic, S., Umihanic, S., & Umihanic, S. (2014). Complications Related to Insertion and Use of Central Venous Catheters (CVC). Medical archives (Sarajevo, Bosnia and Herzegovina), 68(5), 300–303. https://doi.org/10.5455/medarh.2014.68.300-303Tarja J. Karpanen PhD et al. 2016). Clinical evaluation of a chlorhexidine intravascular catheter
gel dressing on short-term central venous catheters. AJIC. 44(55-60). Gibson, F., Bodenham, A. Misplaced central venous catheters: applied anatomy and practical management. British Journal of Anaesthesia, 2013, 110(3) 333-346.
DO 10.1093/bja/aes497 UL https://doi.org/10.1093/bja/aes497 Ullman AJ, Cooke ML, Mitchell M, Lin F, New K, Long DA, Mihala G, Rickard CM. Dressings and securement devices for central venous catheters (CVC). Cochrane Database of Systematic Reviews 2015, Issue 9. Art. No.: CD010367. DOI: 10.1002/14651858.CD010367.pub2. |